Efficiency
-
What sort of targets in regards to energy/hour/source and controller energy/hour should we shoot for?
I know it's a bit variable since ticks vary in duration but are there any benchmarks people use?
-
Well yea, as you already reasoned, there's no real point in measuring stuff in "per hour", it's not reliable at all. The unit of time in screeps is ticks, so lets measure in that. I personally like to map these things out either in "kt" (kilo Ticks: 1000 ticks), or "ct" (creep [life time] Ticks: 1500 ticks), depending on if it involves creeps or not.
Energy/source is quite easy, given how sources are renewed: every 300 ticks, it is stocked up to 3000 energy (in an owned room at least). So that gives you 3000 energy per 300 ticks to mine at max, or 10e/t, 10000e/kt, 15000e/ct. That is what we shoot for, because why ever would we want less than *all* of it? : )
Now, how do you achieve that? I'll share what I have tried so far: The Tutorial teaches us to create all-in-one harvesters that walk to the source, start mining until they are full, then walk back to drop off their energy at the source. This ofc causes a certain downtime in mining whenever he moves and thus it'll need a lot of WORK Parts to make up for that. A creep harvests 2e/WORK each tick, so you'll have to calculate how many ticks a full "rotation" takes, how many of those ticks are ticks it is working at the spawn, and then make sure you have enough WORK parts to get juuust enough energy that the source will be empty the moment it's timer hits 0. The more CARRY parts the harvester has the longer each "rotation" lasts, but the more efficient it'll be since the movement part of the rotation will become less relevant. the more MOVE parts it has, the shorter the move time as well, tho yes, you can also have too many MOVE parts and waste some energy with it. Thats quite a balancing act and tends to turn out rather huge creeps. Big creeps are expensive, and since they aren't immortal, that very directly impacts your income for that source, since you can directly deduct the creep cost from those 15000e/ct I mentioned earlier. Ofc you can build multiple smaller ones since especially in the beginning without extensions you won't be able to build the big creeps anyway, but that's usually even less efficient, given that each of them needs their own move parts then.
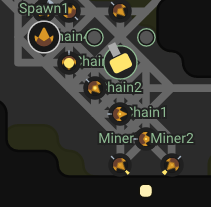
Another way I've seen in use and that I personally prefer are dedicated miners and carriers. I have 2 miners at my source, each with 1 MOVE and 1 CARRY, one of them with 2 WORK, the other one with 3 WORK. Together, they will harvest exactly 10e/t from the source. Then I have carrier creeps with the only purpose to grab energy from the miners and bring it to the spawn, so that the miners themselves never have to move again once they are at the source and can focus on harvesting their whole lifetime. Those carriers can either be runners, running back and forth between miners and spawn like the harvesters did, or form a chain, standing still and just handing the energy to the next carrier. I haven't done much math on that yet, but my carriers are chained and thus only need 1 MOVE and 1 CARRY each. At the minimum distance the spawn can be to a source, that's 4 carriers between spawn and miners. The first carrier grabs energy from both miners, the other 3 are chained behind him all the way to the spawn. It's very cool to watch since thats more or less not a typical RTS harvester anymore, but a pipeline instead, a continuous stream of energy being pumped into your spawn.. ^^ Now thats 6 creeps doing the work very very efficiently with very few body parts, but ofc they cost a bunch too when summed up, again reducing your effective income from that source. Also, the chaining I do turned out to be rather prone to issues since the whole chain stops if just one of the carriers dies, so there's still a lot of room for improvement for me, I guess... : )
As for the controller: well, whatever you can spare. You'll have to balance it by calculating how much energy you need to keep your system running, including respawns, and a bit of building and road repairs and whatnot, and then transfer everything thats more than that to the controller. There's not really a fixed amount anybody could tell you that you should aim for, as long as you at least do *something* with your controller to keep it from leveling down again.